 |
| Colorado Proud!!! |


Wednesday, December 4, 2013
Crochet Away: Colorado Slouchie Beanie
Peek into: The Craft Room

I haven't posted about the craft room before, mainly because it still wasn't very setup. I had some time over Thanksgiving break to get some things organized (hide some other things in the closet) and make it look presentable with what I have so far. This room had a built in bench/desk that I thought would be perfect, but in actuality it's a really small tight spot when you're working with a bigger piece of fabric.
Wednesday, November 13, 2013
Minoru Round Two...and Three: The Plans


Do you guys remember the Minoru jacket I made? I love this jacket so much I'm planning on making two more, another for me and one for my mom! I had mentioned before really liking the fit of this jacket and the possibility of wanting to make a heavier version for the winter or even try to make a longer version for snowboarding. I looked around for waterproof/breathable fabric that would be good for a snowboarding jacket and most fabrics really wouldn't cut it. I did find a website that sells outerwear/extreme fabric and they had Gore-Tex and a number of other really good fabrics that would handle extreme cold and snow really well, but they were all really expensive and plain. If I'm going to shell out a lot of money on fabric I at least want a pattern that I like otherwise I can just buy one, but I guess that's the tradeoff for a jacket that fits your body perfectly.
My mom's jacket is going to be olive green, with a nice cozy furry lining, complete with a lined hood and some additional pockets added in. Since I nixed the snowboarding idea I'm now thinking of making a mudcloth jacket.
 |
| Mudcloth Fabric from Spoonflower - $17.50/yd |
I'm not quite sure yet whether I want to buy pre-made fabric or make my own. The pre-made fabric is pretty expensive, but making my own would be time consuming and the supplies needed could add up and end up being expensive too. I do like the idea of making my own pattern on my own jacket thought.
 |
| Credit - Apartment Therapy |
Apartment Therapy even has a mudcloth tutorial that is easy to follow and the end result came out really cute. It really just comes down to the time it would take to mark out the design, lay down the glue on the design, and then dyeing the material. The jacket takes 4 yards of fabric to make, which is a lot of fabric to mark out a design on. The other option would be to make the entire outer shell out of plain canvas, and then once it's sewn together I could mark out the design and dye it. It would be a lot easier to mark out a design on an already assembled jacket and that would make the design fit together better as well. That may be what I end up doing after all! I'll probably go to get fabric in the next couple of weeks for these, and since I already have all of my pattern pieces cut out and saved from the last time I doubt it will take me very long to make these. Fingers crossed!
Spare Bedroom Update


| Polka dots everywhere! TV trays as a desk? It'll work for now! |

If you remember from my theme board I wanted to accent the walls with gold polka dots. I found some gold contact paper online and got to work.
Crochet Away: Swirl Beanie


 |
| I would pick colors that contrast more if I used this pattern again |
Wednesday, November 6, 2013
Entrance Way Update: Quick and Easy Shoe Rack

It's been far too long since I last updated, but that doesn't mean I haven't been working on things. I have a backlog of things to post as well as a bunch of projects I want to get started on, and ideas I can't wait to share. We've slowly been making the house our own, mainly by painting, but also by getting things fully setup and decorated. One easy area to get setup was the entrance way. We do have a little closet right next to the front door, but it's not big enough to store everything. A shoe sturdy shoe rack was an easy way to give more space and add a pop of color to the entrance. We have a decal of some camels hanging up in that hallway and one of the colors is blue, so it ties in really nicely.
.jpg)
This project was extremely simple and could be completed in a day. Click the link below to read the whole story.
Wednesday, October 2, 2013
Adding Color: A Painted Vase

About a week or so ago I had some time for another simple cheap project. If you remember from my spare bedroom theme the colors for that room are green, gold, white/cream, and coral. If you are ever on Pinterest you've probably seen pictures of glass vases, sculptures, or candle holders people have taken to painting. The neat thing is that instead of painting the outside you paint the inside, which if your vase is glass, this leaves you with a nice shiny outer surface. I thought that it was a neat and easy idea, plus it would help me add some color into the spare room.
Easy Wardrobe Addition: Jean Jacket Vest

I was down in Denver a couple of weekends ago and I noticed a lot of people wearing jean jacket vests. Is this a new thing? I loved it. It's such a simple way to make an outfit a bit edgier. I usually wear mine with a dress when I want something that'll keep my arms warm and I don't want to wear a cardigan or zip up hoodie. I love my cropped jean jacket, and I've had it for 4 years at the least. I've been wearing it less and less because I was slightly tired of the cropped look and the arms are were starting to get a bit too small in the shoulders.

But after I saw all the jean jacket vests in Denver, I decided to cut the sleeves off mine and make my own. This is a really simple project and only involves scissors or a rotary cutter. If you cringe at the thought of chopping up a jean jacket you have or don't really want to buy a brand new one to cut it up, check out your local thrift shops.


This vest is perfect for fall, i can wear it over longer sleeve shirts and layer. On a warmer day i can still wear it with a tank top or a dress. It's lightweight but does still provide that extra layer you need in the mornings here at this time of year(it's been in the low 40's) but it wont't leave you sweaty the way a down vest would in the afternoons which are still getting up to 70. Plus I feel like I have a new piece in my wardrobe to change things up!
 |
| My photographer disappeared on me, but you can still get the idea! |
Wednesday, September 18, 2013
DIY - Transform Old Shoeboxes
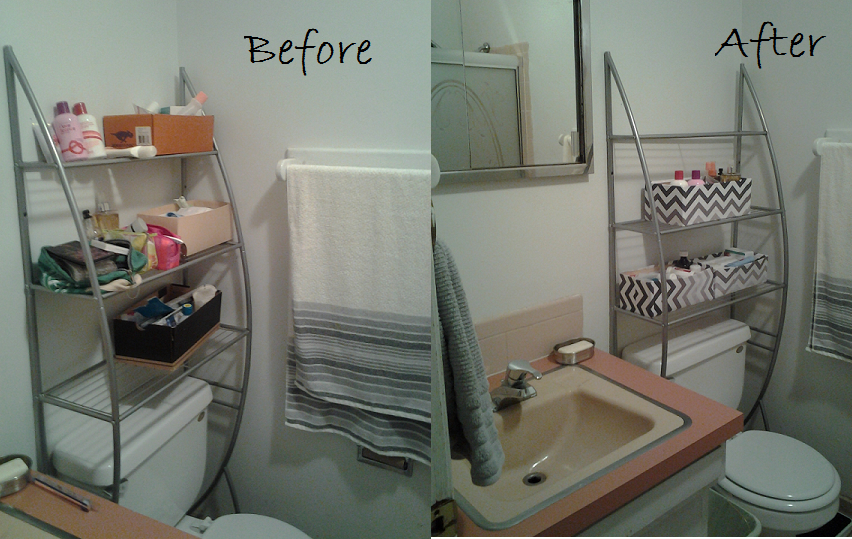 |
| Before: my weak attempt at a storage solution After: much more appealing and put together |
It's the little things that really bring a room together. Having coordinating colors and themes while playing with different patterns also helps. I don't really have much room in my bathroom, the only storage areas are under the sink and behind the mirror. I use the space under the sink to store cleaning supplies, and keep products I use on a more day to day basis on my shelving unit above the toilet. I decided last year to start storing some of my things like nail polish, make up, medicine, etc. in old shoe boxes I had laying around to cut back on having all of my knickknacks everywhere. You can see how even though things are in boxes in the before picture it's still pretty messy, and none of the boxes match each other or the grey/black/white/pink theme of the room. I've seen plenty of pictures of cute little boxes or baskets people have bought to hide clutter while keeping things pretty and I decided to just cover the boxes I already had.
Bathroom Theme
 |
| Check out the individual ideas on my Bathroom Pinterest Board From Top Left Clockwise: Poppytalk DIY:Custom Fabric Boxes Apartment Therapy's Renters Solutions for pink bathrooms Chevron Wall Inspiration Real Simple's 15 min. DIY centerpieces Mt. Casa Washi Tape |
Tuesday, September 17, 2013
Spare Bedroom Theme
 |
| My theme board - check out the individual ideas on my Pinterest Spare Bedroom Ideas Board |
Way back in April I had posted about doing a bedroom makeover for the spare bedroom since I had just finished with my dresser redo. I had a theme board going then, but now that I've completed some of the projects from it I decided to refocus what I wanted to do with the spare/guest bedroom. I was also waiting until I got the duvet cover finished since that was a major piece to the room, but now that's wrapped up I'm really motivated to get this room looking like something out of an interior design magazine. Plus my mom is coming to visit in a month, and she'll be staying in this room.
I'm planning on buying some pillows tonight, and i'm still sticking with my green, gold, cream, and coral theme. I want the majority of the pillows to be cream and emerald, with a few gold and coral ones for accent. I really love the gold and white polka dot one, and the gold octopus one. From what I saw online, the octopus pillow is pretty expensive, so I'm going to try and find something similar on Etsy. Even if I do end up dyeing my duvet cover emerald, the pillows will still fit. Additional purchases I'm planning on making are a few things from Nate Berkus's Target Fall Collection which I found out about courtesy of a post on Design*sponge today. He has some really cute items and accessories at a wide range of prices that I think will really fit the room without breaking my budget.
The last thing that I think will really tie this room together, in addition to hanging up some art is putting a little color on the walls. With rentals it's always hard to decide whether to paint, if your landlord will even allow that, or to spend money on removal wall paper. Adding color or wall paper can really help tie in the designs of your rooms, and make them feel more personalized and homey. I looked into removal wall paper and it was all really expensive. But then I saw a post of a nursery that had used contact paper cut out in circles and placed on the wall as polka dots. Sold! So i'm going to buy some gold contact paper and put up some little polka dots across the walls. The nice thing with the polka dots is that they can be any size and don't necessarily need to be lined up or in any specific order. All in all I'm really excited about this space, and can't wait to order and get stuff in so I can post some pictures of the whole finalized room!
Monday, September 16, 2013
DIY Ruffled Duvet Cover


| Anthropologie's Nimbus Duvet Cover - $130 My Copycat Version - $60 |
It's been quite awhile since I've had time to do a craft project, let alone post one. Seeing as how labor intensive this duvet cover was to make I feel like it makes up for all the projects I didn't get around to over the summer. Now that the seasons are changing and it's getting chillier here I end up spending more time inside which means more projects get finished. We also moved into a new house, and I have plenty of ideas for projects and things I want to do. I plan on posting some of my ideas and room inspirations from my Pinterest boards later on this week.
I originally wanted to make a duvet cover because the comforter I have is years and years old and is dirty and flat, and should probably be thrown away. Seeing as how I'm into using things until they disintegrate in my hands I figured I could probably just make a simple duvet cover to pretty it up a bit, and extend the lifespan of the comforter. While looking around online I originally found a number of beautiful duvet covers on Anthropogie's website . If you click that link you'll be taken to images of some of gloriest looking bedspreads you can imagine, the downside is that they all cost between $150-$399! Even a pillow/sham is around $80-$90. Gag, right? Lucky for me, there are a lot of other bloggers out there who had the same idea as me and just decided to make their own versions and had step by step tutorials to follow.

I originally based the version I wanted to make off of the Cirrus Duvet cover, but I can't find a link from the Anthropologie website of that, however they have a very similar version called the Nimbus Duvet cover, which is the picture up top on the left. I followed Mari Makes tutorial, which was fantastic and easy to follow. I did some things differently: I didn't add a border to mine, and instead of having the strips of fabric that hold the ruffles in place show I chose to keep those on the inside. I felt that they really broke up the look of the ruffles. I used really small pieces of fabric for my strips, so maybe the size and the fact that I kind of rushed through it made it unaesthetically pleasing to my eye.


I originally wanted the duvet cover to be emerald green, the theme for the spare room is based around the dresser I redid, and I thought an emerald cover would really tie that in while being dark enough to make it less obvious if it got stained/dirty. I wasn't able to find emerald flat sheets anywhere though which is why I put this project off for awhile. I finally just settled on white, however I did see a cute pair of coral colored flat sheets at Target. I bought 3 queen sized flat sheets, 2 for the front and 1 for the back. I won't go through the step by step, you can check out the Mari's tutorial for that, but this was pretty easy to make if not time consuming. The most frustrating part to me was the amount of fabric you were working with, a lot, and the space you need to lay everything out when measuring, etc.
I love the way it turned out and I can't wait to buy some new pillows and continue decorating this room, check back soon for a post dedicated to my spare bedroom decorating ideas and updates on the room itself!
Tuesday, July 9, 2013
DIY Felt Sewing Booklet

I finally made it over to the craft store (JoAnn's) this weekend and picked up some things for my next couple of projects. Even though I couldn't find my stack of coupons, which of course I saw immediately when I got back home, it's student discount month and I got 20% off. Whoop!
 |
| Craft loot |
 |
| Copyright Martha Stewart |
A Travel Tale: Pisa

!!!!!!!
My Aunt Gretchen, or at least I think it was my aunt and not a random blog reader named Gretchen, sent me a blog message asking to share something about Italy. One of my favorite days was the day my sister and I ventured on a day trip from Florence to Pisa. We started out our morning at our hotel, the Fattoria Degli Usignoli which was up on a hillside in San Donato/Fronzano, about 30 minutes outside of Florence. Breakfast usually consisted of one, or in my case 2 because they were delicious and it was Italy, croissants with this delicious chocolate spread called Nutkao. Followed by some fruit, or a hard boiled egg, or a mini sandwich with salami, cheese, and bread. Not to mention some coffee or a cappuccino, or a cup of both!
Click the link to see the rest of the day trip in Pisa
Monday, June 17, 2013
Back from Travels
Hi everyone! I'm just getting back from traveling to Italy and spending some quality time with my family back at home. I had a fantastic trip and loved Italy so much. From the food and culture to all of the unbelievable historical sights. Rumor has it that a big work conference is going to be in Italy next year so it looks like I might get to go back sooner than I would've imagined.
Needless to say, I haven't done any crafting but that doesn't mean I don't have plenty of plans. My mother wants a Minoru jacket after seeing how mine turned out, and I really want to put together a duvet cover for my bed. I hadn't been able to find any emerald sheets, but I'm going to do some heavy duty searching in order to find something that can work. My grandmother thought that white sheets with an ivy design might work well, and that's what I'm considering doing in a last ditch effort if I can't find any emerald. I have plenty of other little projects that I want to work on as well. Since we're moving at the end of July my friend Kate and I have been brainstorming decorating ideas as well as crafty things we want to work on together. I can't wait to have someone (who lives with me!) to work on fun crafty things together and just brainstorm with. We even have decorating plans for a craft room. I know we're going to want to do everything at once, but hopefully we can reign ourselves in to go slow and just systematically work room by room. I'm guessing it will take about a year to get everything the way we want it and have money to buy the things we need to do so. Plus, I guess I have to give them some time to actually get settled into their new surroundings.
Speaking of time, why does it seem like the summer months are the busiest jam-packed months? I had/have all of these plans for hikes and beach days but between work and moving and crafting time it doesn't seem like i'll get to just take time to just relax in the sun. My whole week is already scheduled and it's only Monday. I have a white-water rafting work field trip tomorrow during the day, in the evening I'm going to see Mean Girls with some friends at Red Rocks ampitheater. Wednesday I have a volunteer info meeting since my friend Danielle and I have volunteered to work at Colorado Brewer's Festival this Saturday. So busy, but I can't really complain because all of those plans include fun. I just wish I was less scheduled. All that being said I feel inspired to do a mid-month wishlist full of relaxing things that are perfect for the summer months.
Make sure to check back for that and hopefully some craft related posts!
Tuesday, May 28, 2013
Minoru Update: It's Finished


I finished my first ever jacket, and it was so easy to make! I can honestly say that I loved this pattern from start to finish. The pattern and instructions included were easy to understand and very clear and if I was ever confused I would just click over to the sew-along posts that Tasia has posted over at Sewaholic. I was surprised at how fast I got this done. I was originally thinking it wouldn't be finished until the end of July, but it only took me two weeks! I am dying to make a couple other variations of this. I definitely want a heavier version for winter, and a snowboarding version if I can find the right fabric. The long length, sleeves, and high collar would make this coat perfect for snowboarding in. Most snowboarding apparel is still geared to guys and even the women's brand's still make 'baggy/boyfriend' style apparel. It will be nice to look like a girl for once when riding!

The pockets are even I swear, I'm just grabbing it weird
The only changes I would make would be to line the hood, and possibly add some outside pockets the next time. I originally was going to put dark blue/black buttons on the pockets but I snapped my button in half so I figured the red just make the pockets pop.


| I like the fit on the jacket a lot too. At first I was worried that it would be too big once completed, but once you add the the elastic to the waistband it comes in quite nicely. However I still have room to wear sweaters or bulkier objects underneath without feeling like a sausage |


There is only one thing that I did wrong when sewing. I accidentally sewed the inside collar on the lining on the wrong side so the seam is sadly visible. No one can notice it because it's only visible on the inside around my neck, but it's just one of those things that will drive me crazy forever. At least I know for next time, and will hopefully remember not to do that again. Other than that I was pleased to not have made a lot of mistakes or little things that I would notice even if no one else does. I can't wait to try out some of Tasia's other patterns as well!
Free Finds: Filing Cabinet

Look what I picked up yesterday! Corey and I were walking the dogs when he noticed this filing cabinet and directed my attention to it. I've started to look around for free or cheap patio table, you know the kind with the glass top that usually comes in a set with metal chairs. I really want to do a project like this painted glass tabletop project that was featured on Design*Sponge awhile back. Unfortunately the few I've seen on Craigslist were already sold and the ads outdated.
What I'm most excited about with this filing cabinet is all of it's potential. It's just drab and ordinary, right now, but it can be used for so many things. Right now I'm either thinking of making it into a bedside table for a reading light and a place to set phones, etc. Or in our new place my soon to be roomate Kate and I have been talking about having a craft room, and I think this would be the perfect way to store yarn and other supplies! If I could find another one we could get a piece of wood cut to make a table with the filing cabinets on each end. Even if we just spruce it up with a fresh coat of white paint and get some new handles I'll be happy.
Follow the link to see some cleverly up-cycled filing cabinets
Wednesday, May 22, 2013
Scrambled Eggs: The Microwave Edition
I've been doing a bunch of sewing posts lately so I wanted to change things up and make sure I was sharing things that all of my readers could use/enjoy. Hopefully if I have time this weekend I'll have another non-sewing related project to share with you guys as well!

So another title you're probably all reading and thinking "gross, scrambled eggs in the microwave." Do not doubt me on this, at least try these once before you write me off entirely. They have never once come out dry, rubbery, burnt, or ruined in anyway. I've been making these microwave scrambled eggs since high school, so that is a couple of years of tried and true egg making. I want to say that I originally read about this way of cooking eggs in The Chicago Tribune, and to this day I'm glad I did. These only take a couple of minutes to make, and are great for the mornings you want a substantial breakfast but may be running short on time or just don't want to get out the frying pan and have to deal with all of the clean up. Food purists are probably cringing right now, but these are so good and quick it's worth dealing with other people's disgust. Click the link to get the step by step.

So another title you're probably all reading and thinking "gross, scrambled eggs in the microwave." Do not doubt me on this, at least try these once before you write me off entirely. They have never once come out dry, rubbery, burnt, or ruined in anyway. I've been making these microwave scrambled eggs since high school, so that is a couple of years of tried and true egg making. I want to say that I originally read about this way of cooking eggs in The Chicago Tribune, and to this day I'm glad I did. These only take a couple of minutes to make, and are great for the mornings you want a substantial breakfast but may be running short on time or just don't want to get out the frying pan and have to deal with all of the clean up. Food purists are probably cringing right now, but these are so good and quick it's worth dealing with other people's disgust. Click the link to get the step by step.
Monday, May 20, 2013
Golden Lemon Cheese Pie
Don't be alarmed by the title, the only cheese in this pie is cream cheese, and it's delicious. Here in Colorado there are no pie places that I've found as of yet. Back home we have Baker's Square and their pies are delicious. My two favorites are the french silk and the lemon supreme, which I didn't really like as a kid but it has definitely grown on me since then. My mom told me a story about how my dad, my grandparents, and herself were all planning going to go on a diet in the new year. That New Year's Eve they got a lemon supreme pie from Baker's Square, split it into four humongous pieces and ate them as last gluttonous farewell before their diets started the next day. That's how good this pie is.
Anyways, my grandma sent me a recipe that she said was similar to the Baker's Square Lemon Supreme Pie. Corey and I are going to a cookout at a friends tomorrow and so I decided to try out the Golden Lemon Cheese Pie recipe and bring that. From the licks of the filling I tasted while making this pie I think it's going to be very similar to the Baker's Square version. Follow the page break to get the recipe!
 | ||
| Is your mouth salivating yet? - Baker's Square Lemon Supreme Pie |
Monday, May 13, 2013
How To: Recycle Jeans or Capris into shorts
Tutorial

So I had a pair of jeans that had a hole in the crotch area which I had already previously hacked up to make my dogs jean jacket vests in addition to a pair of capri pants that I decided to use to make some shorts. I've had the capri's since I was in undergrad and they were a boxy fit to begin with on the bottom of the leg and I finally realized they'd serve me better as shorts. I always feel like I have a hard time finding shorts that I like, they're either too short or too tight in the waist/butt but then too loose in the legs or vice versa. That all being said I figured I couldn't go wrong using jeans that I already knew fit me well in the waist. Make sure to click the link to read the full how to.

So I had a pair of jeans that had a hole in the crotch area which I had already previously hacked up to make my dogs jean jacket vests in addition to a pair of capri pants that I decided to use to make some shorts. I've had the capri's since I was in undergrad and they were a boxy fit to begin with on the bottom of the leg and I finally realized they'd serve me better as shorts. I always feel like I have a hard time finding shorts that I like, they're either too short or too tight in the waist/butt but then too loose in the legs or vice versa. That all being said I figured I couldn't go wrong using jeans that I already knew fit me well in the waist. Make sure to click the link to read the full how to.
My Minoru Jacket - Fabric Update

I made it over to JoAnn's this weekend and finally picked up the fabric and other materials I need to make my Minoru Jacket ( see the first blog post here ). I wanted a bright jacket suitable for spring or fall, the majority of my jackets are either black or navy blue or some other dark color. I usually pick dark material because I have the unlucky habit of spilling things on myself or just getting things dirty somehow. Sadly I will probably never be able to own a white coat because of the latter reasons. Hopefully I am adult enough to keep this coat relatively clean, and so I got this "dandelion" yellow cotton twill fabric for the outside. For my inner lining I was originally thinking of a navy blue, but I saw this awesome minty green "celadon" lining fabric that I thought would make an interesting chic color combo. For some reason it looks like a sky blue in this picture but it is actually more green. I got my zipper, elastic, thread, and interfacing while I was there as well.
The pattern calls for a yard of interfacing, but I picked up about 6 yards at .99 cents. I use the interfacing to trace out the pattern sizes I will need instead of cutting them out of the pattern and then cutting my fabric around them. The interfacing is see through so it's easy to lay the pattern underneath and trace on top. While it does take more time and is essentially an extra step I do it so that I don't damage the original pattern pieces. Plus if I ever sew a coat for someone who's a different size than me I still have all of the size lines to follow on the original.
I threw all of my fabric into the wash yesterday so that way it won't shrink in the wash when I do wash it the first time after it's fully constructed. I'll probably start tracing out all of my pieces tonight and if I feel motivated I'll cut them out of my fabric as well. It's finals week for me, but luckily I only have one final. It is open note which is sort of a pain because we have a lot of notes and not a lot of time during the final to flip through them so I'll be busy preparing for that. Other than that it's maybe summer now here in CO, it's 88 today! I have a couple of pairs of old jeans/capris that I want to turn into shorts especially now that the warmer weather is here so check in later during the week for some tutorials.
Wednesday, May 8, 2013
Simple Sundress or Beach Wrap


| Coco seemed to think Corey was giving treats and she kept hopping around |
I love summer sundresses. They're light so you never get hot and usually made of stretchy material so you never feel uncomfortable. I don't know why anyone bothers with pants or shorts, I for one will be trying to get away with wearing the dress above as many days as I can. If you're ever on Pinterest you've probably seen this gorgeous Victoria Secret Beach Wrap :

It retails for $49.99 but you can find some knock-offs for $29.99 if you sleuth around the internet long enough. Or you can do what I did and make one for $7.99! I had a leftover yard of that rayon/spandex purple fabric from one of the maxi skirts I made. I was originally just planning on this being a bathing suit cover up but it's really sturdy and can function as a sundress as well. You'll only need a yard of 60" fabric more if your fabric isn't that wide or if you make a longer dress version. I have all my steps listed after the link.
Tuesday, May 7, 2013
Making a Poster (Part 2)
I know you all were probably thinking I forgot about my original Making a Poster post, but I didn't. I had a craft fail moment and then just decided to wait and use pictures for my posters instead. I was under the impression that I could make my own Holi-like powders, similar to those used in the Design*Sponge Holi Inspired Poster Tutorial, by mixing cornstarch with food coloring dye. This didn't work, the dye just turned the bits of cornstarch it touched into a blob. I really didn't want to buy Holi-Powder just to make a poster or two and so I played around with spray paint and regular paint on some white pieces of printer paper too, but wasn't really liking how that looked either.


These would've made the ugliest posters ever. You cannot make art out of everything
I finally just decided to look through pictures of places or things that I had taken and turn them into posters. What better way to remember favorite moments than by having a poster of that moment hanging on your wall! I used a picture from my collection and two awesome shots by my equally awesome friend Kenzie (Check out her Flickr and Instagram while you're at it!) of Coco and Neva. I followed the 'guidelines' from the Design*Sponge tutorial that's linked above as far as dimensions go and used Irfanview instead of Photoshop.


All that's left is for these to be printed at Kinko's on some matte paper and framed - just in time for me to use my 60% off framing coupon at JoAnn's! I liked this project because it was extremely simple and I didn't feel pressed for time, I was able to just open my pictures and edit them. Technology has allowed for us all to carry a camera with us every where we go, and many of my friends and myself included are constantly snapping pictures. You post them and sometimes forget about them, and this way you get to see them when you walk into a room. I'll be sure to post the finished posters once they're hung. Feel free to send me posters you guys make as well and I can do a roundup post of all of your creations.


| I love the way the light is reflecting off of Coco's ears in the second picture! |

All that's left is for these to be printed at Kinko's on some matte paper and framed - just in time for me to use my 60% off framing coupon at JoAnn's! I liked this project because it was extremely simple and I didn't feel pressed for time, I was able to just open my pictures and edit them. Technology has allowed for us all to carry a camera with us every where we go, and many of my friends and myself included are constantly snapping pictures. You post them and sometimes forget about them, and this way you get to see them when you walk into a room. I'll be sure to post the finished posters once they're hung. Feel free to send me posters you guys make as well and I can do a roundup post of all of your creations.
Subscribe to:
Posts (Atom)