



photo HomeHeaderPages_zps121b83d7.jpg  photo AboutHeaderPages_zps6faf416f.jpg  photo ContactHeaderPages_zps0989aee4.jpg
Showing posts with label Clothing. Show all posts

Sunday, May 3, 2015

'Wearable Muslin' White Denim Ginger Jeans

Pattern: Ginger Jeans - Closet Case Files
Fabric: White Stretch Denim - JoAnn's

It's still quite unbelievable to me that I'm sitting here in my first pair of jeans ever - the jeans that I'm probably going to wear everyday this week if I'm being honest. Oh man, making these was equal parts great and awful. So many things went wrong most likely because I was distracted by whatever Netflix show I was watching. That's the point of making a muslin right? To figure it all out before you make the real thing. Luckily these turned out wearable but just barely. The nice thing is that I did feel like i learned a lot and I know now what fitting changes I will make for next time. And there will be a next time because I have 6 yards of raw denim waiting on my shelf to be cut into - wahoo!

Connie is thinking 'Why are you taking so many pictures of your butt?'
Also can you see the dirt on my seat from riding my bike seat earlier? This is why I can't have nice things

I knew I wanted to make a muslin of these because I've never made jeans before and I was worried about all kinds of fitting issues. I decided to make view B first which is the high waisted skinny leg variation. Before sewing I basted all of the pieces together and everything seemed to fit just fine. What I completely ignored at the time was that the waistband was falling about 2 inches below my belly button. On the instructions there's a little notation that says that view B is supposed to fall right above the belly button. When I cut out my pieces I based them off of the finished measurements listed. I cut a 12 throughout the legs and hips but graded to an 8 up to the waist and I cut an 8 in the pockets as well. Big mistake number 1. This would've been fine if the rise of the jeans actually ended above my belly button where I fit into the size 8 measurements, but because these fit lower on me where they ended was about a size 10 measurement. So when I tried them on after sewing them pretty much together minus the buttonhole they were way too tight around my waist. The pockets were also to small and were gaping and bulging. Disaster.
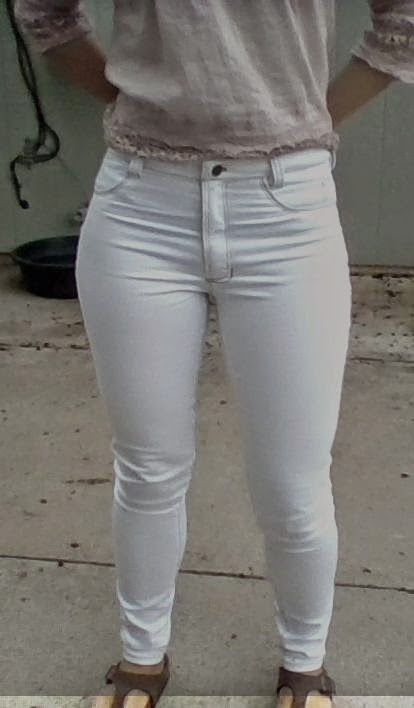

 Luckily due to the 5/8" seam allowance I was able to unpick them at the sides and ease out the seam to a 1/4". I had enough leftover fabric to recut the waistband and all was good and well... until I pulled the slider off the zipper and then almost cried when i couldn't get it back on. I was ready to give up (I was not taking apart the fly front and resewing it with a new zipper) when I managed to get it back on. Crisis averted and all was well...except for the pockets which were still gaping because they were too small. So I decided to just sew them shut along the topstitching and voila! No more gaping - alas no more front pockets. Who uses front pockets anyways? The fix for next time is to lengthen the wait rise of the pants at the lengthen/shorten marking probably by an inch or two. I think I'll still cut a size 12 through the legs, grade up to a 10 through the hips & start of the torso and end at an 8 around my belly button. I think I'll err on the side of caution and cut the pockets at a size 10 next time just to avoid gaping issues.


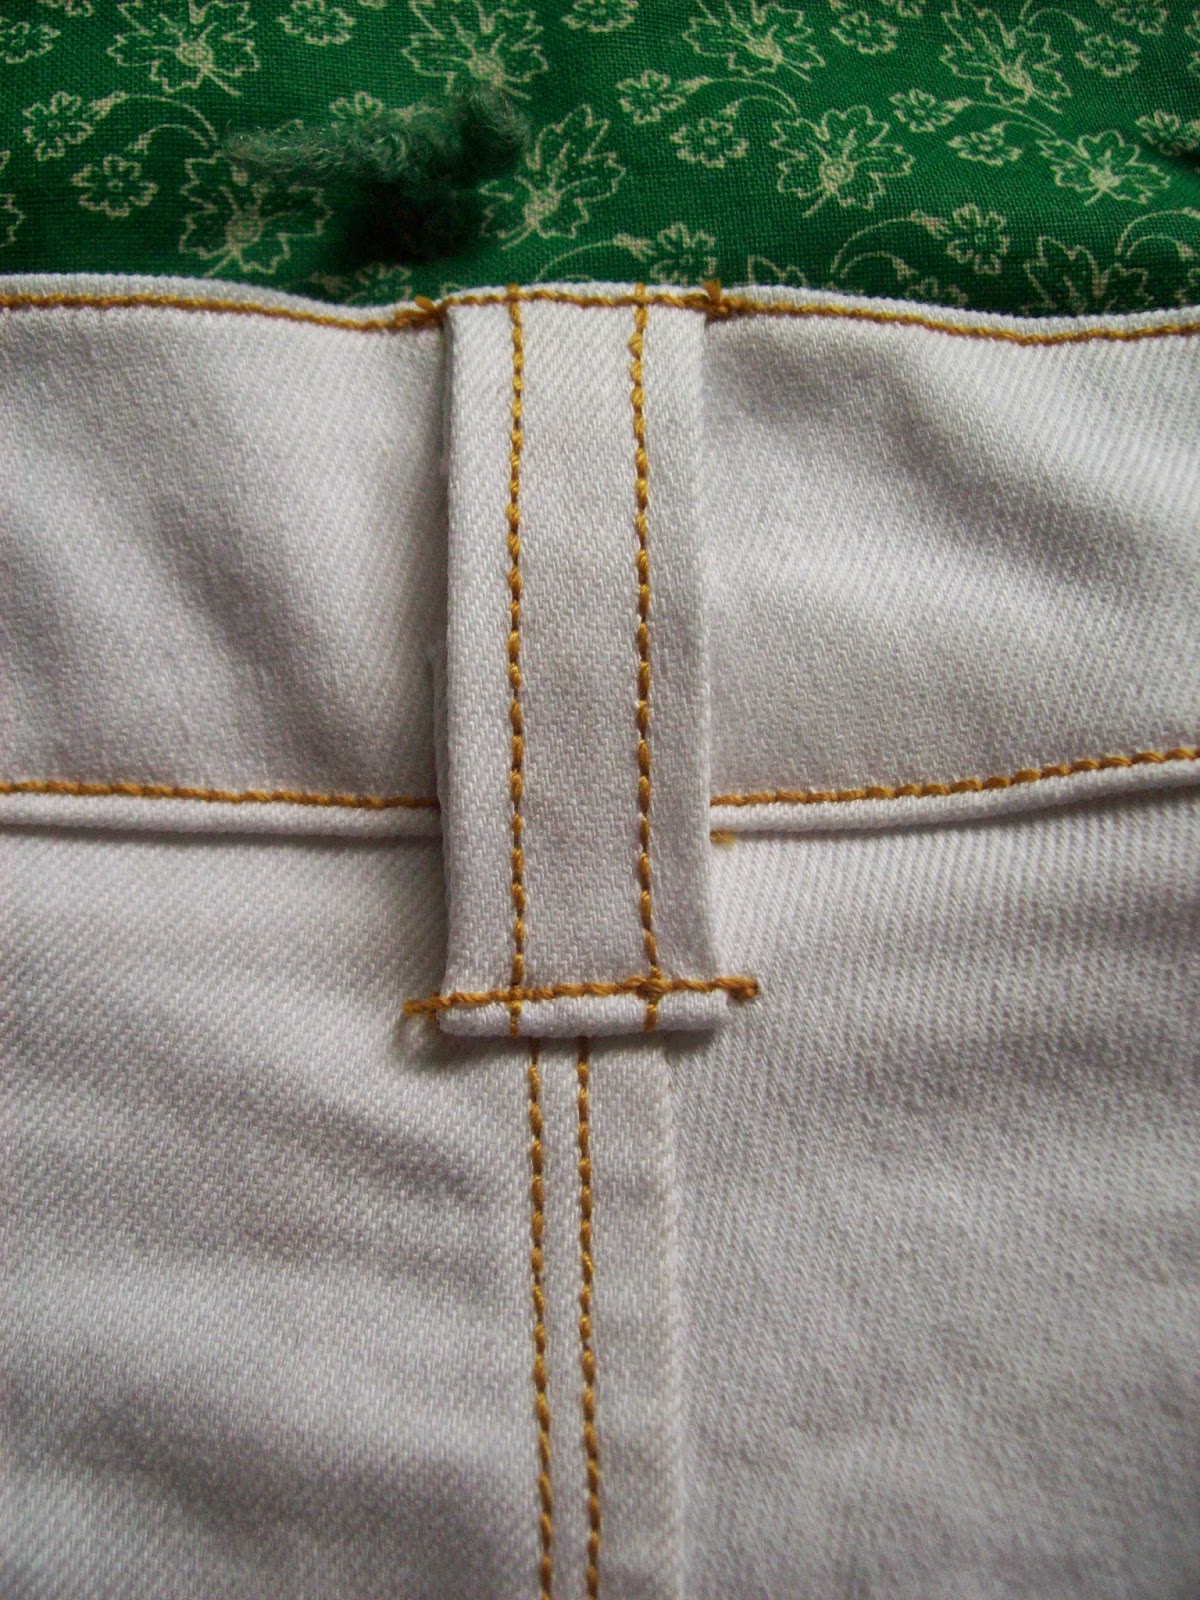
The topstitching was actually really fun even though I need to work on going slowly and staying even a bit more. My basic Singer machine handled it like a pro and only needed some coaxing over the thicker fabric areas.

These took me about two and a half weeks to finish mainly because I only had time to sew in fits and spurts. I'm pretty sure they'll take less on this second pair. I'm going to take a break and sew something else in the meantime but then I'll be back with my second pair. I have some otter wax I've been holding onto that I think I'm going to use to make a waxed pair! Let me know what you guys think in the comments below.

Tuesday, April 28, 2015

Ponte Knit Alyssa Dress

Pattern: Alyssa Dress - Spit Up & Stilletos (formerly Sewloft)
Fabric:  Ponte Knit Fabric - Remnant from JoAnn's

I sewed this dress in a day way back when before Easter but never got around to posting it until now. This was a really straightforward pattern - just two pieces - and I sewed my standard size 8 grading out to a 10 in the hips. I should say this was also a free pattern! Spit Up & Stilletos used to be Sewloft Patterns but they decided to make the switch from women's patterns to children's patterns and as a result all of their old women's patterns are free pdf downloads. Needless to say I downloaded just about all of them and based off of how this dress turned out I think it was a pretty good idea.


Since I used a ponte knit this is a bit tighter/slimmer fitting and it's easy, depending on what I pair with it, to dress it up or down. I think it would be interesting to make this again in a knit fabric with more stretch because I'm pretty sure the fit would be more sundress and less bodycon.


All in all it's a nice addition to my summer wardrobe, I used up some fabric I had laying around, and I felt like a sewing champ after making it in two hours. In other news I've been working on my 'muslin' ginger jeans for the last two weeks and I'm pretty sure I'm going to be finishing them up today - so excited to be able to wear them and get started cutting into my fancy raw denim.

Saturday, February 28, 2015

By Hand London - Textured Sabrina Dress

I was trying to catch the light so you could see dress and the fabric texture

Fabric: textured ponte like knit - Colorado Fabrics
Pattern:  Sabrina Dress - By Hand London

How's it going everyone? I feel like it's that part of the winter where I'm anxious for spring but we're really no where close - do you guys ever feel like that? That all being said I figured making a dress would perk me up even though it hasn't really been dress weather here. Oh well...This is a pattern I've made twice before to make dresses as Christmas presents for my two roommates. I never posted about those dresses because I hadn't taken any pictures but the pattern is pretty easy to follow and sew up.


Both times prior to making this version I had used a non-stretch fabric which gives the dress a much more crisp appearance. This is a pretty sturdy knit and I actually like the drape and weight of how this turned out. Not to mention that because it's a cozy knit fabric this dress is super comfortable. The pattern calls for an invisible zipper up the back. I left that out due to the ease of the knit and it was a good decision because I didn't need it at all. I actually might need to take in the dress a bit on the sides but I'm going to wait until after I wash it just in case it shrinks a little bit.


I flat-felled all of the seams in order to get a nice clean finish on the inside but I kind of wish I hadn't. The reason for that is that the texture and weight of the fabric makes the seams look a little bulky at least to me. I feel like if I had just left the seams unfinished the inside of the dress might be a little ugly but the outside would look more smooth. This dress can definitely be dressed up or down depending on what I wear it with and all in all I think it's a great addition to my wardrobe. I love the texture of the fabric - I actually think it might be the same fabric Erin from sewbon used in her magena fringe jumper. Textured fabrics really stand out to me as different and they just add that extra detail that you don't see in a lot of clothes. That being said it was super hard to photograph but I tried my best.


It felt great to make a dress and I'm already planning my next one. Hopefully I'll have some chair updates to share with you all by the end of the week...i'll just say, it's looking great!

Thursday, January 8, 2015

Upcoming Projects: Reupholstering and Sewing


I thought it would be fun to share some of the things I'm getting ready to start working on both sewing and re-upholstery related.

What a spoiled little pup!

One of the projects I'm most excited to get started on is re-upholstering this wingback chair. I found this thing on the side of the street last fall for free and carried it home where it then sat in the garage for the last couple of months. I finally brought it inside and into my room, and as you can see my roommates dog immediately tried to claim it as her chair. The chair is actually in great condition, the current fabric is a little stained and worn around the lower deck, but other than that it's fine. Right now my room mostly consists of things that are green, white, dark brown, and some gold and bronze. I really want to add some color into this 'reading corner' and I figured this chair would be a great place to start. 

 
I just purchased a whopping 8 yards of this medium weight cotton Hamilton Reflections Fuchsia fabric (shown above) from fabric.com. It was pretty pricey, but I had a giftcard (thanks grandma!) from Christmas that I decided to put to use. I think the print will be big enough to not be overly busy while adding in some pops of color that are complementary to the room currently. I definitely think it will modernize the chair for sure! I'm also planning on getting some fabric to make pillows in other fun bright colors that I can sit on the chair or throw on my bed. One of the fabrics is shown above, and it is also from fabric.com - I haven't ordered it yet. I just got an email saying the fabric is a going to ship a little bit behind schedule due to all of the orders they're currently processing (everyone probably got giftcards for Christmas). In the meantime I need to pick up some burlap, foam padding, staples, twine, dacron, and cording. I'm debating on whether i want to line the borders of the chair with cording/piping or use tacks. While I'm waiting on the fabric to get here I'm going to start stripping the chair and retying the springs and adding new padding. I'm so excited about this project.


Before they sold out last fall I managed to purchase one of the denim kits that Closet Case Files was selling with the ginger jeans pattern. The kit came with the pattern and enough denim and notions to make two pairs of jeans. The pattern is a skinny jean pattern that includes a normal rise and high waist variation. My kit came before I left for break, but I haven't gotten a chance to do anything with it. I need to get some muslin fabric to make up a practice version before I cut into the denim. Once I get the fit together I'm going to whip these up because I love jeans and two new pairs tailored to my body specifically sounds like a dream!


I also purchased a Watson Bra & Panty Kit from Blackbird Fabrics in the peach color (the photo above shows the sapphire and black kit). The kit includes enough fabric and notions to make one bra/underwear set. The pattern isn't included, but the pattern I'm planning to use (shown in the photo above on the left) is the Watson Bra and Bikini Pattern from Cloth Habit. The pattern includes variations for both a long line bra (shown above) and a regular length bra, both sans underwire. I've seen and read great reviews of this pattern and it looks like a pretty introductory pattern to the lingerie world of patterns. I've been accumulating quite a stash of knit fabrics that would work great with this pattern and I think it would be a good way to use those little scraps I always seem to have left behind.

I have a list of other patterns and fabrics I want to sew into things, but the stuff listed above is what I'm focusing on first and foremost. Plus this post is already long enough so I'll leave you with that. If you're really interested check out my pinterest page and look at the Patterns Fall/Winter board. Hopefully I'll have time to work on some things soon!

Tuesday, January 6, 2015

Christmas Makes: Finlayson Sweaters, a White Russian Sweatshirt

Eating, and eating, and more eating!

I had a wonderful holiday, I got to go home for two weeks and spend a bunch of time with my family. It was great to get away from work and things in CO for awhile, but it is nice to be back. There's a few weeks before the semester actually starts back up again so I have time to get back in the swing of things here, and do some recharging. Before I left for break I did quite a bit of sewing. I made both of my roommates By Hand London Sabrina dresses (which I'm not going to post today because I only have one subpar picture). Both dresses fit great considering I didn't make muslins of them as I wanted them to be a surprise. I ended up hemming one by about 4 inches and taking the other in just a wee bit on the sides.


Fabric: Black Ethnic Diamond on White Cotton French Terry Blend Knit Fabric - Girl Charlee 
             2 x 1 White Cotton Solid Rib Knit - Girl Charlee
Pattern: Finlayson Sweater Pattern - Thread Theory Designs, Inc. 

I've never made my brother, dad, or grandpa anything I've sewn so I thought this Christmas I'd gift them all with Finlayson Sweaters. This was my first time using a Thread Theory pattern and my first time really sewing any menswear. I thought the pattern instructions were clear and organized and very well written, and all three of my sweaters turned out fantastic. One thing I really liked about this pattern was the different ways you could customize the sweater. I chose to make the version lacking the hood and front pocket, but I was still able to add details at the collar and back of the neck. I think the collar is my favorite part of this sweater. I love how it folds over and how the use of a contrasting fabric really stands out. This sweater was for my brother who's 23. I thought this print was really fun and 'young' and I was hoping he'd like it a lot.

 
My brother modeling! It fit him great, he even wore it as his Christmas outfit

The fit on this ended up being great, it was a little bit loose in the arms, but I think that's due to the fabric having a lot of stretch. Hopefully once it's washed it'll tighten up a bit. 


Fabric: Deep Forest Cotton Modal Lycra French Terry Knit & Sandalwood Cotton Modal Lycra French Terry Knit -
          Girl Charlee

I unfortunately didn't get pictures of my dad and grandpa wearing their Finlayson's, but they fit them both great as well. I made my dad the Forest Green one and my grandpa the Sandalwood color. I think they were both surprised that I had made them sweaters. It was fun to see the looks on their faces when they realized that, yes, I really did make them! For these two I didn't use ribbing on the cuffs or hem, instead I just used the terry knit fabric. Girl Charlee didn't have ribbing in matching colors and I thought white or black would stand out too much.


Fabric: Koala Gray Cotton Jersey Sweatshirt Fleece Fabric - Girl Charlee
             Black Cotton Solid Rib Knit - Girl Charlee
             Black Piping - JoAnn Fabrics
Pattern: White Russian Sweatshirt - Capital Chic Patterns

Last, but certainly not the least is a gray quilted White Russian Sweatshirt that I made for my mom. I've made two White Russians before ( one quilted and another appliqued ) and loved the way they both turned out. My mom had previously mentioned wanting a quilted one, and boy did I pull out all the stops on this one. I loved the way it turned out so much I wanted to keep it. I used real ribbing for the cuffs, hem, and collar which makes it look more like a RTW item. My favorite detail besides the quilting is the black piping I added at the raglan seams! I'm not going to lie, I was inspired by the piping on this fabulous wool top that Katy from Katy & Laney made. All in all I think it was a successful, but a little stressful, handmade gift giving season.  Next year if I make clothes for my family I want to start much much earlier that way I don't have to cram it all in last minute. I'm planning on posting again later today or sometime tomorrow on all of the upcoming projects I have planned. Can't wait to get back to my sewing machine now that I've had some time away.

Monday, December 8, 2014

Rochester,NY - Flower City Inspired White Russian Sweatshirt

Fabric: White Waffle Knit Fleece - Colorado Fabrics
Pattern: White Russian - Capital Chic Patterns

After I made my first quilted white russian sweatshirt I knew I'd be making another before long. I picked up this fabric from Colorado Fabrics when I went down to Denver around September. It's hard to see in the pictures but the right side of the fabric actually is textured with a waffle pattern while the inside/wrong side is some of the softest fleece I've ever felt. The material has a bit of stretch to it and it's kind of spongy. I know that's a weird description but really there's no other way to describe it. When you pinch it between your fingers it almost feels like a foam mattress pad. The inspiration for this sweatshirt comes from Rochester, NY where I lived for a year a couple years back. Rochester was originally referred to as the 'flour city' due to producing a ton of flour, but as farming practices changed and the city did as well the nickname got changed to 'flower city'.

The city of Rochester logo                                                                                  My applique
 
Since the fabric I was using was already textured I decided to do some applique instead of quilting on this version. Out of a black knit fabric I cut out 5 pieces that I traced from the city of Rochester logo. I then pinned them on the center of my fabric and started to sew them on. I quickly realized that picking knit fabric to applique probably wasn't the smartest idea because it immediately started to stretch out of proportion. I ended up handing basting the pieces down, but they still ended up shifting a bit. After applying the applique the rest of the sweatshirt was a breeze to sew.


I figured I'd probably wear this sweatshirt to go snowboarding in a lot because the fabric was so cozy. With that in mind I chose to lengthen the pattern by 4 inches at the hem and grade out from the waist to the hem an inch on each side. I wanted a looser fit because I like to layer clothes when I go snowboarding and I didn't want to feel too bulky.

An action shot of me on the slopes at Keystone


I've already worn this twice to go snowboarding in and I love the feel and the length of it. I prefer to wear longer styled things so that when I fall (which happens a lot) less snow gets in my pants! I finished this and a couple projects ages ago, but never got around to blogging them. For me, if I don't take pictures and post something within a week of finishing I find that I'm less inclined to post it. Usually I've already started on a new project and am just so focused on that I forget about what I've made. With that said I'm trying to catch up on sharing the recent items I've made and the new stuff I'm working on: lots of Christmas sewing!

Thursday, October 23, 2014

Kelly Skirt


Pattern: Kelly Skirt - Megan Nielsen
Fabric:  Plaiditudes Collection - Brush Cotton Herringbone Brown & Black - JoAnn Fabrics (they no longer have this color)

I'd been wanting to make more skirts and dresses that had a 'fall/winter' feel to them so when I saw this heavier herringbone fabric I knew that it was destined to be a skirt. This was a fairly straightforward sew, and one of my favorite parts is that it has lined pockets! I'm not sure why it is but I love dresses and skirts that have pockets on them. In addition to the pockets the skirt buttons up the front and has pleats in both the front and the back. In hindsight I wish I had chosen lighter buttons for the center front so that they'd stand out a bit more. My buttonhole foot was working this time and so getting those button holes done was a breeze.

I was having a horrible time with lighting when I tried to take these pictures so they look a little washed out

I lined the pockets with this malachite cotton silk I had leftover from this tote bag project. Unfortunately I only had a few scraps left otherwise I think I would've lined the entire skirt. The pattern doesn't call for a lining, or include a pattern for one; however, you'd just need a rectangle, but having one would make it a little heavier for colder days. I ended up hemming it about 4 inches more than the pattern called for. I don't think I'd hem it that short again, probably just 2 inches next time, but the original hemline wasn't flattering as it was hitting mid knee. I thought about unpicking the hem and making it a little longer since I realized it  looked pretty short once I put it on, but then I decided I'd most likely be wearing this with tights or leggings this winter and decided to leave it. Interestingly it is finger length (did you guys have that rule in school about shorts/skirts/dresses needing to be finger length too?) but the bell shape because of the pleats makes it look shorter than it really is.


I'm not sure how big of a fan I am of the pleats on the back, from the side at least I feel like it adds to my back side but not in the most pleasant way. I interfaced the waistband and next time would also interface the center front placket in order to avoid stretching with the buttonholes. The only problem I had was that my waistband ended up really tight, so much that it was gaping and I had to sew a snap closure underneath the top button. I'm pretty sure I cut my pattern pieces out correctly, however when you sew on the waistband you leave some overhang that gets trimmed off when you turn the pieces right side out. I think next time I'd leave the overhang and sacrifice the look of everything being lined up down the center. I'm okay with the waistband buttons being a little off center from the center placket. Especially if it means I can eat, move comfortably, or breath when wearing the skirt. I made another version of this for my roommate out of some scrap fabric she had and hers fits perfectly. I'll have to take some pictures of it because it's very different than my version: side zipper, faux button placket, scalloped hem, faux pockets! As always, thanks for reading.

Monday, October 13, 2014

Scoop Neck High Back Long Sleeve Golden Nettie Bodysuit


Fabric: Mustard Yellow Solid Cotton Spandex Knit Fabric - Girl Charlee

If you're thinking another Nettie Bodysuit? The answer is an unapologetic yes! I'm loving this pattern for fall, mainly because wearing super stretchy knit fabric is really comfortable, but also because of how warm and cozy these bodysuits are. When the pattern came out earlier in the summer the thought of wearing a skin tight bodysuit in the hot sun wasn't really appealing to me. Now that the weather has cooled down though these things are great! This was a super quick sew considering that this was my second time working with the pattern, I'd previously made a three quarter length sleeve, high neck, low back version. It took about 3 hours from cutting the fabric to finish, enough time to finish House of Cards and start watching Bates Motel - which has a nice eerie feel to it, perfect for October.


This fabric had a lot of stretch to it similar to the fabric I used for my last Nettie. I wanted to avoid wrinkles around the midsection due to the fabric being too loose so I sewed an 8 through the bust, graded down to a 6 in the waist, and then went out to a 12 through the hips. There are no wrinkles this time and it doesn't feel too tight. I think I could get away with a 10 in the hips. The 12 fits nicely over my bottom, but it's not necessarily snug which isn't an issue just something I might tweak in the future. 


Last time I also had some problems with stretching under the armscye, but the high back seems to have rectified that and I didn't need to make any adjustments throughout the shoulder. Overall I really like the way the scoop neck fits and I like that it's not too low. I had considered getting some other fabric or stretch lace to make a contrasting binding around the neckline, but decided to just go the straightforward route this time. I have a fancy schmancy Nettie dress planned that I think I'm going to incorporate lace into.


Can we talk about how fun this skirt is by the way? Have a great week you guys!